> For the complete documentation index, see [llms.txt](https://docs.kyberswap.com/llms.txt). Markdown versions of documentation pages are available by appending `.md` to page URLs; this page is available as [Markdown](https://docs.kyberswap.com/~/changes/1kQEhDNzHMDf7SwOE6Yu/liquidity-solutions/kyberswap-elastic/user-guides/elastic-pool-creation.md).
# Elastic Pool Creation
## Introduction
In order to participate in a **KyberSwap Elastic** pool and earn fees, you first need to add liquidity to the pool. Adding liquidity to a pool opens a new position. You can add liquidity either to an existing pool, or as part of creating a new pool. This guide describes the steps required to **create a new pool by adding liquidity**.
Note: “Adding Liquidity” should not be confused with “Increasing Liquidity.” Adding Liquidity means creating a new position, whereas Increasing Liquidity pertains to increasing the size of a position you currently hold. You can refer to [Add Liquidity To An Existing Elastic Pool](/~/changes/1kQEhDNzHMDf7SwOE6Yu/liquidity-solutions/kyberswap-elastic/user-guides/add-liquidity-to-an-existing-elastic-pool.md) for a guide on increasing your liquidity position.
Liquidity Provider Flow
Still deciding on which solution suits you best?
* **Overview**: [Earn Yield By Contributing Liquidity](/~/changes/1kQEhDNzHMDf7SwOE6Yu/kyberswap-solutions/kyberswap-interface/user-guides/earn-yield-by-contributing-liquidity.md)
* **Detailed comparison**: [Classic vs Elastic](/~/changes/1kQEhDNzHMDf7SwOE6Yu/liquidity-solutions/classic-vs-elastic.md)
#### Next steps
1. [Connect Your Wallet](/~/changes/1kQEhDNzHMDf7SwOE6Yu/kyberswap-solutions/kyberswap-interface/user-guides/connect-your-wallet.md)
2. [Switching Networks](/~/changes/1kQEhDNzHMDf7SwOE6Yu/kyberswap-solutions/kyberswap-interface/user-guides/selecting-preferred-network.md)
3. **Elastic Pool Creation <-**
4. [Add Liquidity To An Existing Elastic Pool ](/~/changes/1kQEhDNzHMDf7SwOE6Yu/liquidity-solutions/kyberswap-elastic/user-guides/add-liquidity-to-an-existing-elastic-pool.md)
5. [Increasing Liquidity On Elastic](/~/changes/1kQEhDNzHMDf7SwOE6Yu/liquidity-solutions/kyberswap-elastic/user-guides/increasing-liquidity-on-elastic.md)
6. [Elastic Fee Collection](/~/changes/1kQEhDNzHMDf7SwOE6Yu/liquidity-solutions/kyberswap-elastic/user-guides/elastic-fee-collection.md)
7. [Yield Farming On Elastic](/~/changes/1kQEhDNzHMDf7SwOE6Yu/liquidity-solutions/kyberswap-elastic/user-guides/yield-farming-on-elastic.md)
8. [Removing Liquidity On Elastic](/~/changes/1kQEhDNzHMDf7SwOE6Yu/liquidity-solutions/kyberswap-elastic/user-guides/removing-liquidity-on-elastic.md)
## Adding liquidity to create a new pool
Here are the steps to create a new pool and by definition, to open a new position.
### **Step 1**: Create a pool
Ensure you are on the correct network, and then click the “Create Pool” button at the top right of the screen.
Elastic Pool page
This will bring up the Add Liquidity screen, but it will be fairly empty until the parameters of the pool are properly specified.
Pool creation screen
### **Step 2**: Select tokens to add
Select the pair of tokens you would like to create the pool with. You can choose from already whitelisted tokens or [import any token](/~/changes/1kQEhDNzHMDf7SwOE6Yu/kyberswap-solutions/kyberswap-interface/user-guides/add-your-favourite-tokens.md) on your chosen network.
#### Note on pool initilization for low-decimal, high-value tokens
As an open and permissionless protocol, KyberSwap Elastic allows any ERC20 token pool to be created. Consequently, **users are responsible for checking the decimals of exotic tokens** as providing low-decimal but high unit value tokens might result in higher than expected pool initialization costs.
This is due to a small portion of the provided liquidity being allocated to meet the minimum liquidity requirements when creating a new [reinvestment curve](/~/changes/1kQEhDNzHMDf7SwOE6Yu/liquidity-solutions/kyberswap-elastic/concepts/reinvestment-curve.md). While care has been taken when designing this anti-spam mechanism to suit the vast majority of tokens, token teams are still free to define their own tokens. Please refer to [Pool Initialization](/~/changes/1kQEhDNzHMDf7SwOE6Yu/liquidity-solutions/kyberswap-elastic/concepts/pool-process-flows.md#pool-unlocking--initialization) for further details.
Select token pair
### **Step 3:** Select fee tier
With the token pair selected, you will then be required to select your fee tier.
Select fee tier
KyberSwap Elastic currently offers the following tiers to cater for different token pair correlations:
Fee tier options
In general, the lower the token correlation, the higher the recommended fee tier. Higher fee tiers offsets the impermanent loss risks which accompanies less correlated pairs.
1. **Best for very stable pairs: 0.008%, 0.01%, 0.02%**\
These fee tiers are ideal for token pairs that typically trade at a fixed or extremely high correlated rate, such as pairs of stablecoins (e.g. DAI-USDC). Liquidity providers take on minimal price risk in these pools, and traders expect to pay minimal fees.
2. **Best for stable pairs: 0.04%** \
The 0.04% fee tier is ideal for token pairs that typically trade at a fixed or highly correlated rate, such as pairs of stablecoins (e.g. DAI-USDC). Liquidity providers take on minimal price risk in these pools, and traders expect to pay minimal fees.
3. **Best for most pairs: 0.1%, 0.25%, 0.3%**\
These fee tiers are best suited for less correlated token pairs such as the ETH-DAI token pair, which are subject to significant price movements to either upside or downside. This higher fee is more likely to compensate liquidity providers for the greater price risk that they take on relative to stablecoin LPs.
4. **Best for exotic pairs: 1%** \
The 1% fee tier is best suited for even less correlated token pairs such as the ETH-KNC token pair, which are subject to significant price movements to either upside or downside. This higher fee is more likely to compensate liquidity providers for the greater price risk that they take on relative to stablecoin liquidity providers.
5. **Best for very volatile pairs: 2%**\
The 2% fee tier is best suited for very volatile pairs which are subject to extreme price movements to either the upside or downside. The significantly higher fee is more likely to compensate liquidity providers for the significant price risk.
6. **Best for rare use cases: 5%** \
The 5% fee tier is created specifically for the purpose of price discovery for new tokens against exotic tokens such as KNC. As the final price of the token pair can differ significantly from launch, a higher fee compensates LPs for the extreme IL risks during this highly volatile period.
### **Step 4**: Set price range
This is the range at which your capital will be used in the pool. If the market price moves outside the range your capital will not be used and will not earn any fees.
You can set your price range either using the sliders or by typing in prices manually.
Select price range
For convenience, KyberSwap also provides you the option to choose from a list of preset ranges which correspond to different DeFi familiarity and risk profiles. The section below provides some guidance on the percentage-based options matched to the token pair correlation which is calculated by KyberSwap.
Full Range
**All token pairs:** Suitable for pairs with high price volatility. Although you always earn fees, your capital efficiency is the lowest among all choices.
Safe
**Exotic:** Suitable for high-risk appetite LPs for pairs with high price volatility. Anticipating price to fluctuate within \~150%. You can earn fees even if the price goes up by 75% or goes down by 75%.
**Normal:** Suitable for pairs with low price volatility. Anticipating price to fluctuate within \~45%. You can earn fees even if the price goes up by 22.5% or goes down by 22.5%.
**Stable:** Suitable for stablecoin or stable correlated pairs. Anticipating price to fluctuate within \~3%. You can earn fees even if the price goes up by 1.5% or goes down by 1.5%.
**Super stable:** Suitable for stable pairs. Anticipating price to fluctuate within \~1.5%. You can earn fees even if the price goes up by 0.75% or goes down by 0.75%.
Common
**Exotic:** Suitable for low-risk appetite LPs for pairs with high price volatility. Anticipating price to fluctuate within \~100%. You can earn fees even if the price goes up by 50% or goes down by 50%.
**Normal:** Suitable for pairs with low price volatility. Anticipating price to fluctuate within \~30%. You can earn fees even if the price goes up by 15% or goes down by 15%.
**Stable:** Suitable for stablecoin or stable correlated pairs. Anticipating price to fluctuate within \~2%. You can earn fees even if the price goes up by 1% or goes down by 1%.
**Super stable:** Suitable for stable pairs. Anticipating price to fluctuate within \~1%. You can earn fees even if the price goes up by 0.5% or goes down by 0.5%.
Expert
**Exotic:** Suitable for stable pairs. Anticipating price to fluctuate within \~1%. You can earn fees even if the price goes up by 0.5% or goes down by 0.5%.
**Normal:** Suitable for pairs with low price volatility. Anticipating price to fluctuate within \~9%. You can earn fees even if the price goes up by 4.5% or goes down by 4.5%.
**Stable:** Suitable for stablecoin or stable correlated pairs. Anticipating price to fluctuate within \~0.6%. You can earn fees even if the price goes up by 0.3% or goes down by 0.3%.
**Super stable:** Suitable for stable pairs. Anticipating price to fluctuate within \~0.3%. You can earn fees even if the price goes up by 0.15% or goes down by 0.15%.
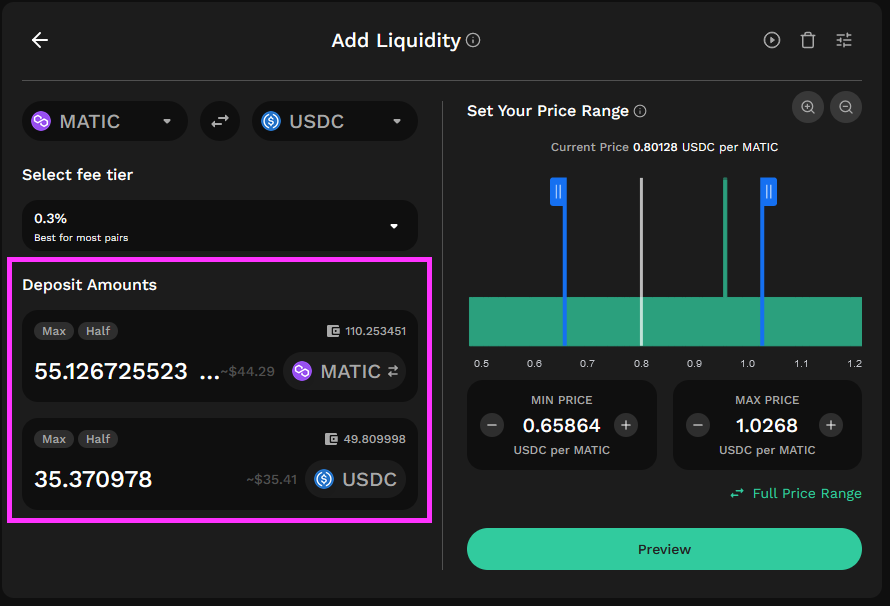
### **Step 5**: Specify liquidity amount
Specify the deposit amounts, or how much liquidity you would like to add to open this position. You can either manually type in amounts or use the “Max” and “Half” buttons. Once you specify the deposit amount for one leg of the pair, the corresponding leg’s amount will be automatically calculated and populated for you.
Note: The proportion of liquidity deposited for each leg of the pair is determined by your price range, so it is helpful to set the price range before specifying your deposit amounts.
### **Step 6**: Authorize contract
If you haven’t already done so, you will need to need to authorize the KyberSwap smart contract to transact using your tokens on this network. Click the “Approve \[Token]” button to do so. This will open the approval dialog window on your wallet.
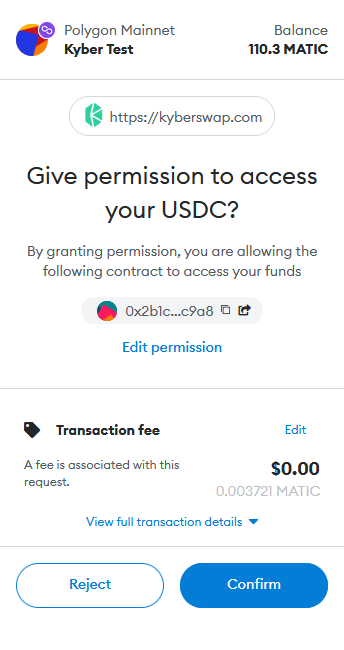
Once the approval is confirmed, the previously-greyed-out “Preview” button will be clickable.
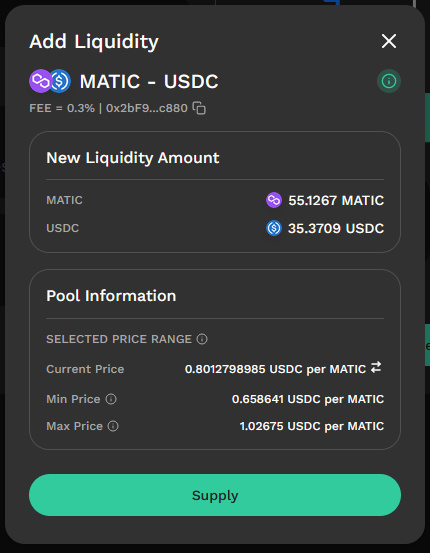
### **Step 7**: Review liquidity provision transaction
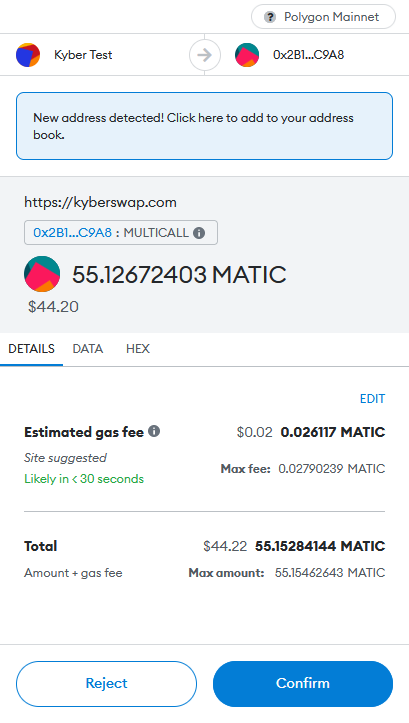
Click on the “Preview” button to bring up the preview screen. Once you have reviewed the information on this screen, click on the “Supply” button to proceed.
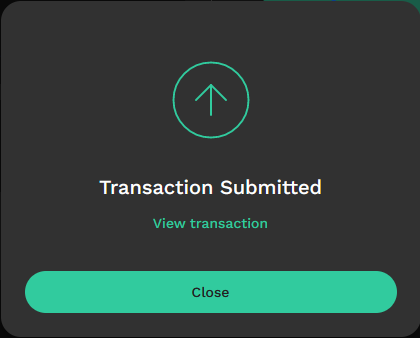
You will need to confirm this transaction in your wallet.
Once you’ve confirmed the transaction you will see a screen informing you that the transaction has been submitted. You can click on “View Transaction” to view your transaction on the appropriate blockchain explorer.
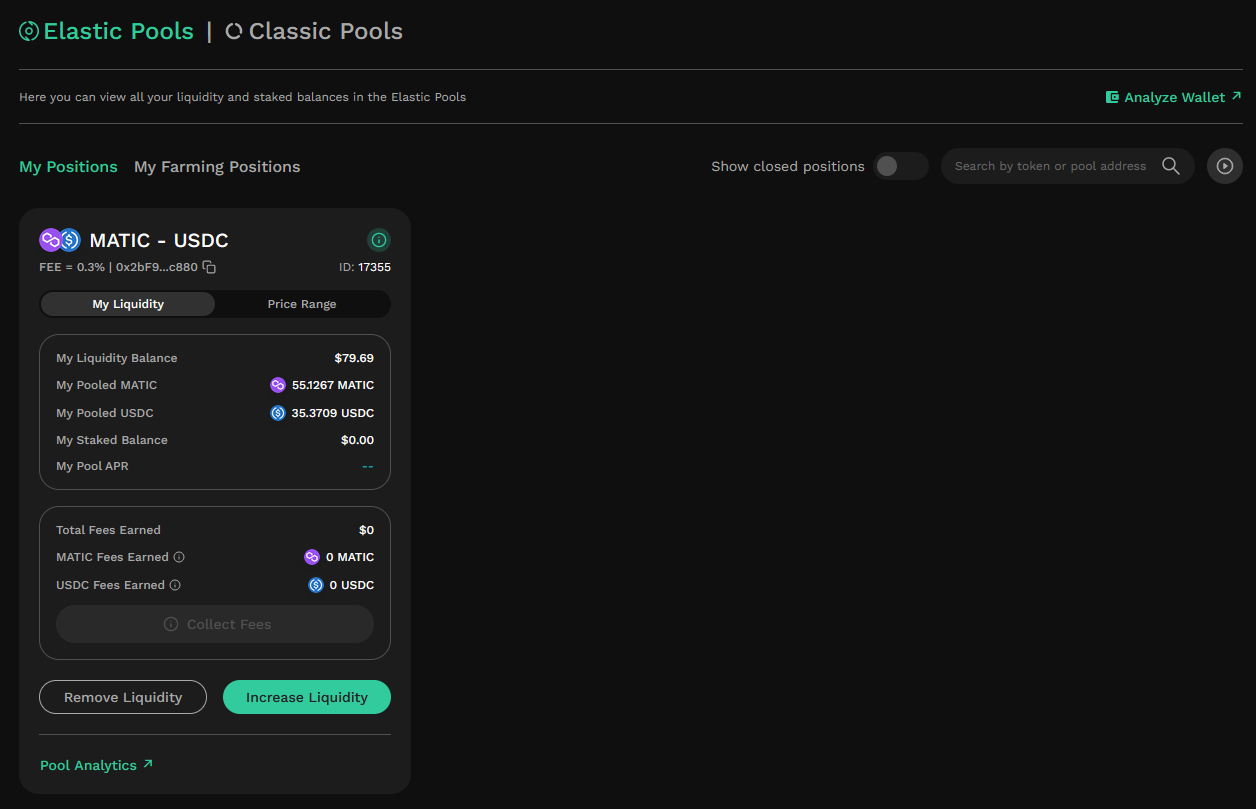
Your new position should now be visible on the My Pools page on KyberSwap.
---
# Agent Instructions
This documentation is published with GitBook. GitBook is the documentation platform designed so that both humans and AI agents can read, navigate, and reason over technical content effectively. Learn more at gitbook.com.
## Querying This Documentation
If you need additional information that is not directly available in this page, you can query the documentation dynamically by asking a question.
Perform an HTTP GET request on the current page URL with the `ask` query parameter, and the optional `goal` query parameter:
```
GET https://docs.kyberswap.com/~/changes/1kQEhDNzHMDf7SwOE6Yu/liquidity-solutions/kyberswap-elastic/user-guides/elastic-pool-creation.md?ask=&goal=
```
`ask` is the immediate question: it should be specific, self-contained, and written in natural language.
`goal` is optional and describes the broader end goal you are ultimately trying to accomplish on behalf of the user. GitBook uses it to tailor the answer towards what is most useful for that goal.
The response will contain a direct answer to the question and relevant excerpts and sources from the documentation.
Use this mechanism when the answer is not explicitly present in the current page, you need clarification or additional context, or you want to retrieve related documentation sections.