> For the complete documentation index, see [llms.txt](https://docs.kyberswap.com/llms.txt). Markdown versions of documentation pages are available by appending `.md` to page URLs; this page is available as [Markdown](https://docs.kyberswap.com/~/changes/1kQEhDNzHMDf7SwOE6Yu/liquidity-solutions/kyberswap-elastic/user-guides/increasing-liquidity-on-elastic.md).
# Increasing Liquidity On Elastic
## Introduction
If you already have a KyberSwap Elastic liquidity pool position that’s doing well, you may want to increase the size of that position. This is called **Increasing Liquidity**.
Note: “Increasing Liquidity” should not be confused with “Adding Liquidity.” Adding Liquidity means creating a new position, whereas Increasing Liquidity pertains to increasing the size of a position you currently hold. Please refer to [Add Liquidity To An Existing Elastic Pool ](/~/changes/1kQEhDNzHMDf7SwOE6Yu/liquidity-solutions/kyberswap-elastic/user-guides/add-liquidity-to-an-existing-elastic-pool.md)if you would like to enter a new position.
Liquidity Provider Flow
Still deciding on which solution suits you best?
* **Overview**: [Earn Yield By Contributing Liquidity](/~/changes/1kQEhDNzHMDf7SwOE6Yu/kyberswap-solutions/kyberswap-interface/user-guides/earn-yield-by-contributing-liquidity.md)
* **Detailed comparison**: [Classic vs Elastic](/~/changes/1kQEhDNzHMDf7SwOE6Yu/liquidity-solutions/classic-vs-elastic.md)
#### Next steps
1. [Connect Your Wallet](/~/changes/1kQEhDNzHMDf7SwOE6Yu/kyberswap-solutions/kyberswap-interface/user-guides/connect-your-wallet.md)
2. [Switching Networks](/~/changes/1kQEhDNzHMDf7SwOE6Yu/kyberswap-solutions/kyberswap-interface/user-guides/selecting-preferred-network.md)
3. [Elastic Pool Creation ](/~/changes/1kQEhDNzHMDf7SwOE6Yu/liquidity-solutions/kyberswap-elastic/user-guides/elastic-pool-creation.md)
4. [Add Liquidity To An Existing Elastic Pool ](/~/changes/1kQEhDNzHMDf7SwOE6Yu/liquidity-solutions/kyberswap-elastic/user-guides/add-liquidity-to-an-existing-elastic-pool.md)
5. **Increasing Liquidity On Elastic** **<-**
6. [Elastic Fee Collection](/~/changes/1kQEhDNzHMDf7SwOE6Yu/liquidity-solutions/kyberswap-elastic/user-guides/elastic-fee-collection.md)
7. [Yield Farming On Elastic](/~/changes/1kQEhDNzHMDf7SwOE6Yu/liquidity-solutions/kyberswap-elastic/user-guides/yield-farming-on-elastic.md)
8. [Removing Liquidity On Elastic](/~/changes/1kQEhDNzHMDf7SwOE6Yu/liquidity-solutions/kyberswap-elastic/user-guides/removing-liquidity-on-elastic.md)
## Increasing the liquidity of an existing position
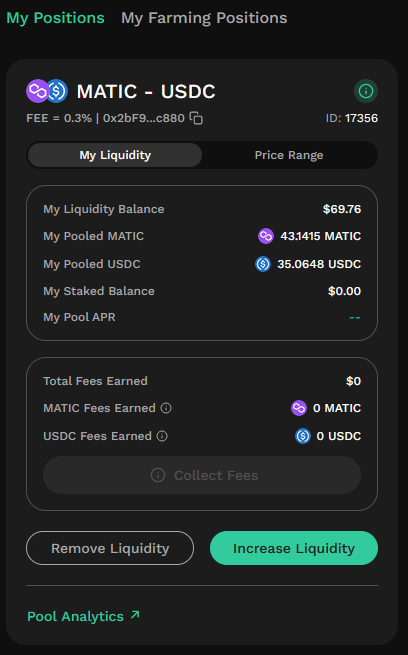
### **Step 1**: Select position
From the My Positions page, look for the position you’d like to increase and click its corresponding “Increase Liquidity” button.
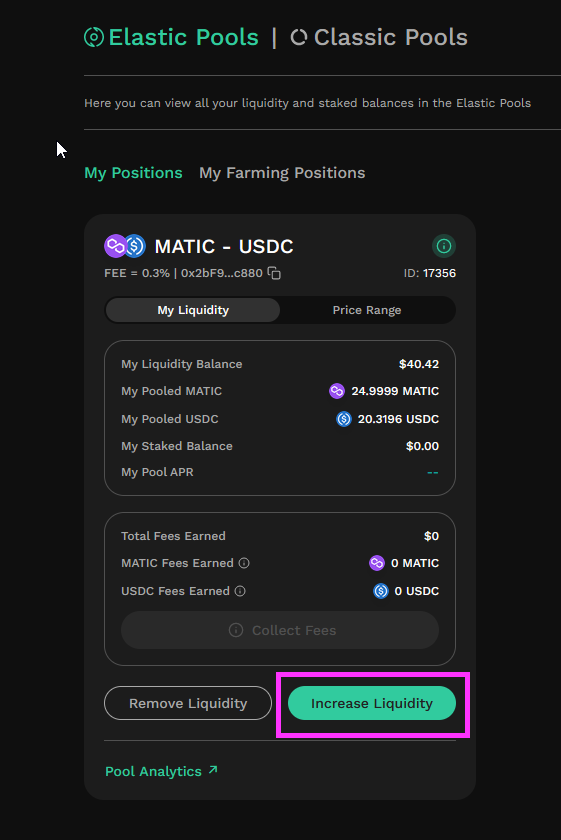
This opens the “Increase Liquidity” screen.
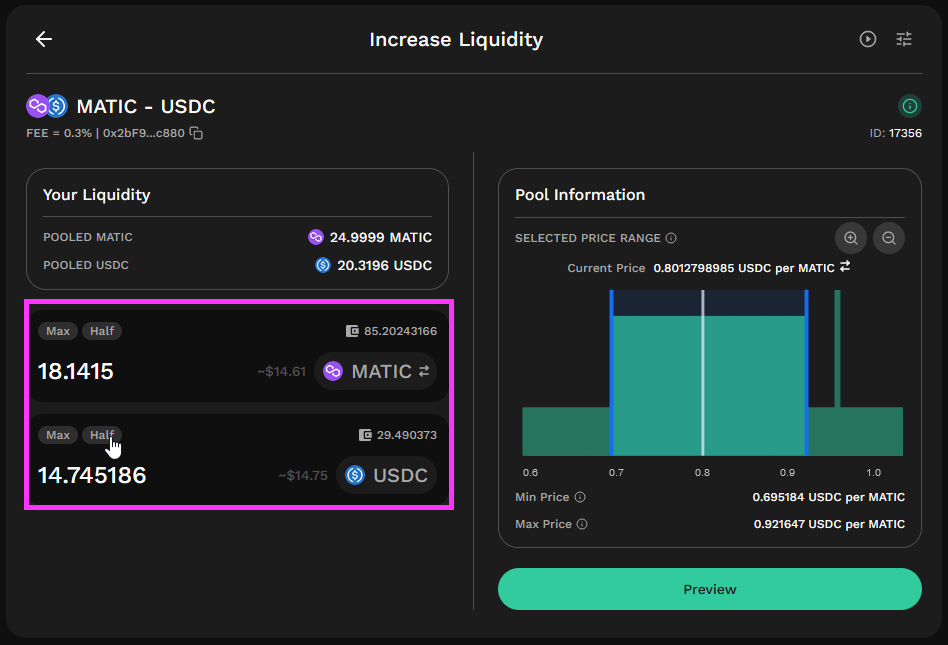
### **Step 2:** Configure additional liquidity amounts
Specify the deposit amounts, or the magnitude of the position size increase. You can either manually type in amounts or use the “Max” and “Half” buttons. Once you specify the deposit amount for one leg of the pair, the corresponding leg’s amount will be automatically calculated and populated for you.
Note: The proportion of liquidity deposited for each leg of the pair is determined by the price range associated with the position.
### **Step 3**: Authorize contract
If you haven’t already done so, you will need to need to authorize the KyberSwap smart contract to transact using your tokens on this network. Click the “Approve \[Token]” button to do so. This will open the approval dialog window on your wallet.

Once the approval is confirmed, the previously-greyed-out “Preview” button will be clickable.
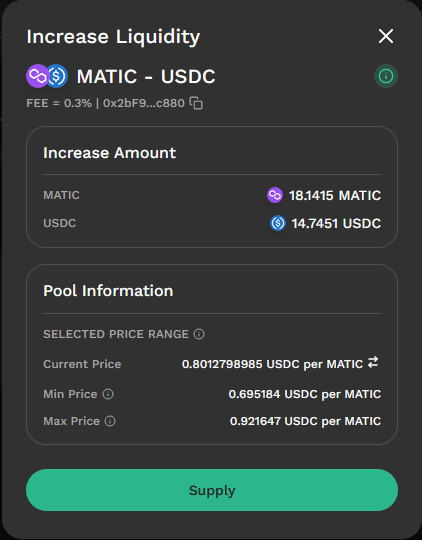
### **Step 4**: Review increase liquidity
Click on the “Preview” button to bring up the preview screen. Once you have reviewed the information on this screen, click on the “Supply” button to proceed.
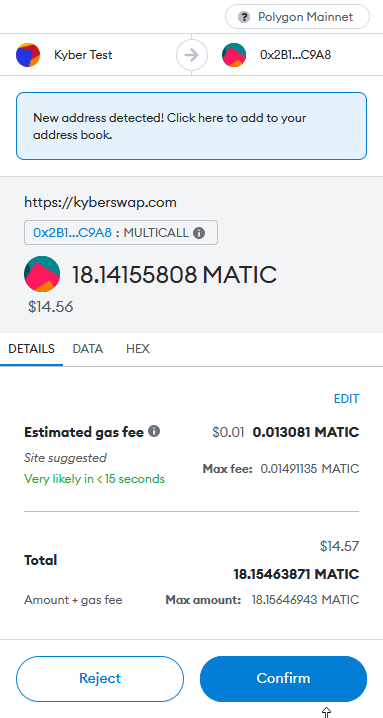
You will need to confirm this transaction in your wallet.
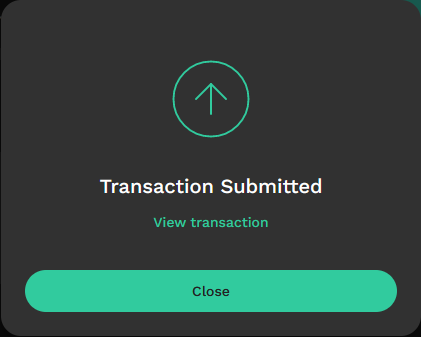
Once you’ve confirmed the transaction you will see a screen informing you that the transaction has been submitted. You can click on “View Transaction” to view your transaction on the appropriate blockchain explorer.
The newly increased position should now be visible on the My Positions page.
---
# Agent Instructions
This documentation is published with GitBook. GitBook is the documentation platform designed so that both humans and AI agents can read, navigate, and reason over technical content effectively. Learn more at gitbook.com.
## Querying This Documentation
If you need additional information that is not directly available in this page, you can query the documentation dynamically by asking a question.
Perform an HTTP GET request on the current page URL with the `ask` query parameter, and the optional `goal` query parameter:
```
GET https://docs.kyberswap.com/~/changes/1kQEhDNzHMDf7SwOE6Yu/liquidity-solutions/kyberswap-elastic/user-guides/increasing-liquidity-on-elastic.md?ask=&goal=
```
`ask` is the immediate question: it should be specific, self-contained, and written in natural language.
`goal` is optional and describes the broader end goal you are ultimately trying to accomplish on behalf of the user. GitBook uses it to tailor the answer towards what is most useful for that goal.
The response will contain a direct answer to the question and relevant excerpts and sources from the documentation.
Use this mechanism when the answer is not explicitly present in the current page, you need clarification or additional context, or you want to retrieve related documentation sections.